Module 1: Getting VR Ready: Devices, Accounts, and Setup
Enable instructors to independently set up, configure, manage, and maintain VR headsets and accounts without relying on technical staff.
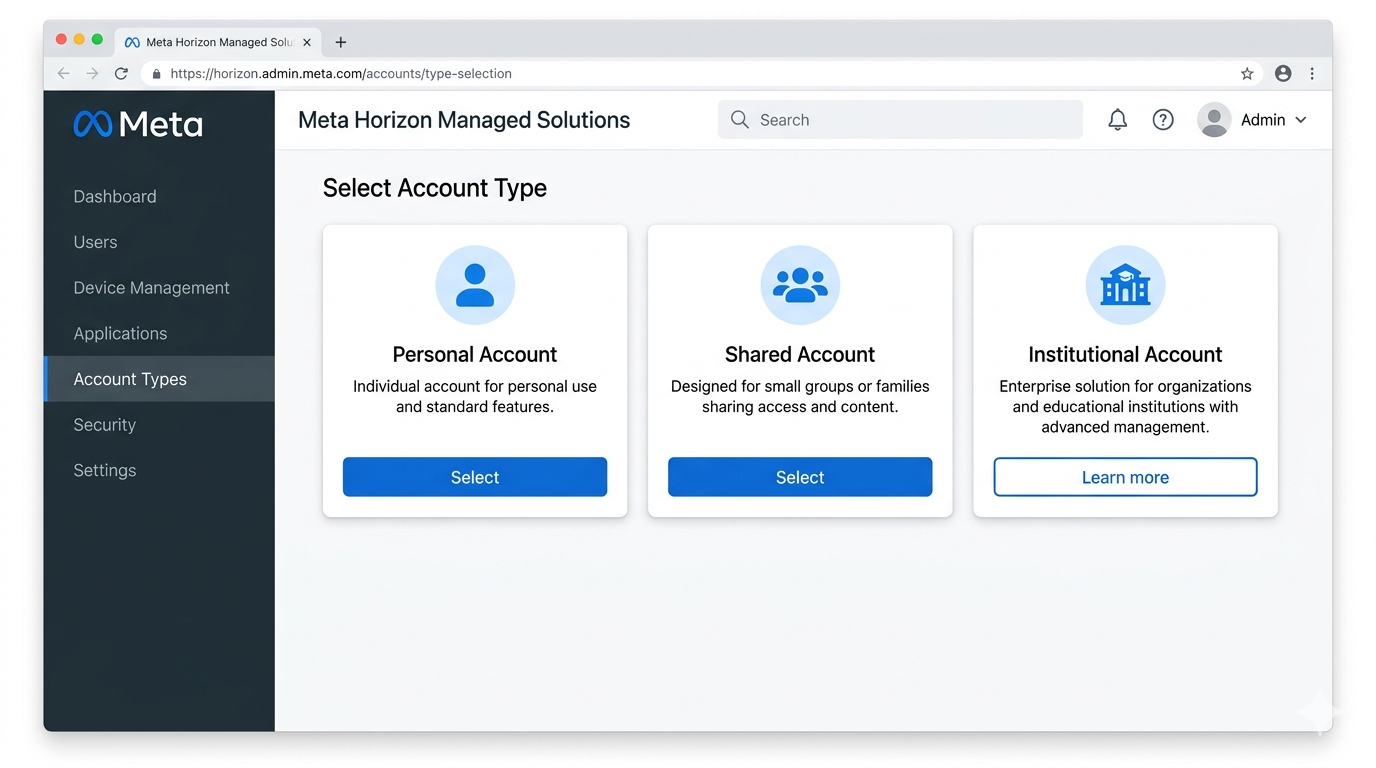
Types of VR accounts (Meta Quest)Reference
On Meta Quest you can use different types of accounts depending on context: personal, shared, or institutional. Choosing the right one avoids management issues and aligns with your institution's policies.
Summary
- Personal account: one user per account; it can be used in class with a simple setup.
- Shared account: multiple users on the same account; has limits and risks; best practices should be followed.
- Institutional account: managed by the institution with Meta Horizon Managed Solutions (MHMS); ideal for device fleets and centralised control.
Personal accountReference
A personal Meta account is an individual account tied to one user. It can be used in the classroom: setup is simpler and does not require enterprise services.
Headset setup and account creation
The process includes powering on the headset, choosing language, connecting to Wi‑Fi, and creating or signing in with a Meta account. You can follow official guides such as:
Shared accounts (pros and cons)
If several people use the same personal account:
- Pros: fewer accounts to manage, same content across headsets.
- Cons: limits on account sharing, risk of mixing data and violating terms of use. Document good practices (who uses which headset, avoid changing passwords without notice) and be aware of Meta’s limits on shared use.
Institutional accountReference
Institutional accounts are managed with Meta Horizon Managed Solutions (MHMS) for education and work. They allow centralised management of devices and accounts.
What it is and benefits
- Centralised management of Quest fleets.
- Accounts within an organisation with admin permissions.
- Activation via codes (activation code, community code).
- Individual and Shared modes; deactivation and account management from the admin panel.
Official resources
- What are Meta Horizon Managed Solutions for education
- Getting started with Quest for Business
- Meta Work help
- Deactivate an account in Quest for Business
- Manage accounts in Quest for Business
- Set up an account inside an organisation
- Create an admin account
- Create an account inside the organisation
- Get your MHMS activation code
- Where to find your MHMS community code
- Admin permissions in Quest for Business
- Difference between Individual Mode and Shared Mode
- What is Shared Mode in Quest for Business
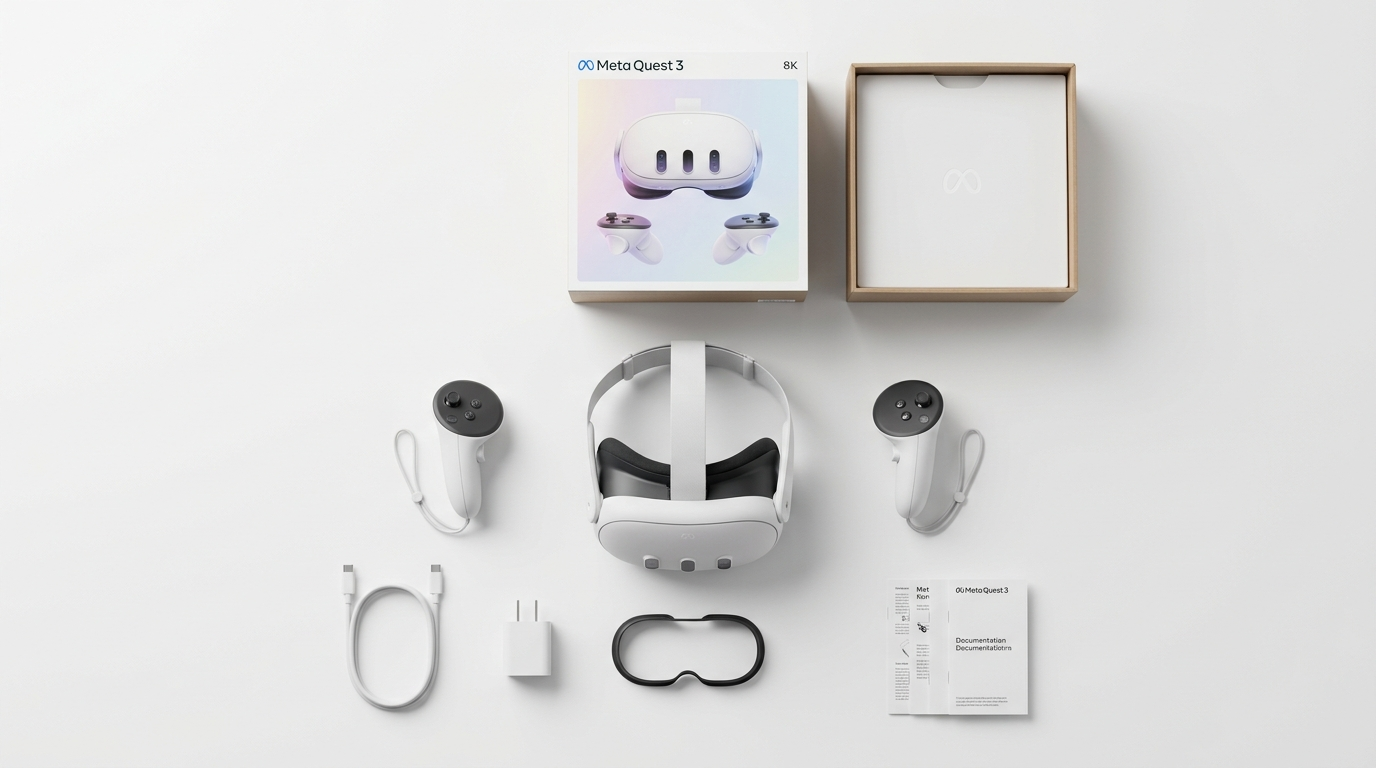
Getting started: in the box, how to wear, IPD, languageEssential
Before using the headset in class, it helps to master the basics: what’s in the box, how to wear it, IPD, and language.
In the box and first steps
- Follow the Get started with Meta Quest 3 guide.
- Correct headset placement, strap adjustment, and lens position.
- Adjustable lenses: Quest 3 allows you to vary the interpupillary distance by gently sliding the lenses. A numeric indicator between the lenses will show the selected position.
- Straps and facial adjustment: the top and side straps are adjustable. By combining the adjustment of these with the tilt of the headset on your face, you can find the optimal position for clear and comfortable vision.
- IPD (interpupillary distance): adjust the wheel between the lenses so the image is not blurry or double; improves comfort.
- Language: set it in Settings so students see the interface in the course language.
Wearing with glasses
Meta Quest 3 and 3S can be used with prescription glasses of reduced dimensions, according to manufacturer specifications, and include an accessory that increases the space between the VR headset and prescription glasses, avoiding pressure and increasing comfort. See Wear Meta Quest 3S with glasses for recommended distance and accessories (facial spacers).
Meta Quest 3(S) in the classroomEssential
To use Meta Quest 3(S) in the classroom in an orderly and safe way, set up the headsets and space before class.
Headset setup
This includes powering on, account (personal or institutional), Wi‑Fi, Guardian/play boundary, and if applicable, pairing with the mobile app for management and casting.
System settingsReference
System settings let you adapt the headset to the space and user. Review these before each session.
Key topics
- Headset lights: indicate status (on, charging, updating). See What the lights on Meta Quest 3(S) mean.
- Passthrough: see the real environment through the cameras. Activate passthrough on Meta Quest 3(S).
- Guardian / play boundary: defines the safe zone. Set up a play boundary. During setup:
- Select the interaction type: stationary or room-scale. For most applications, choose "Room-scale".
- If automatic floor detection is not accurate, manually indicate the floor location.
- Define the safe zone by drawing on the floor with the controller trigger, marking the available movement area.
- Hand tracking: use hands without controllers. Turn on hand tracking.
- Controllers: Pair controllers with Meta Quest 3(S). Many applications only use the right controller. Make sure it has battery (AA or rechargeable). When you move it or press any button, it should be automatically detected by the system.
- IPD: Change IPD on Meta Quest 3(S).
- Language: Supported languages and how to change language.
- Screen recording: Screen record with Meta Quest 3.
- Developer mode: only if you need to install apps from external sources. Activate developer mode.
- Updates: Update the operating system of Meta Quest 3(S). Updates are not downloaded automatically; to get them, you need to access the "Update" section within the app if new versions are available.
You can complement with a complete Quest 3S beginner’s guide (buttons and general use).

Mobile connectionReference
Connecting the headset to the Meta Quest (Horizon) app on your phone makes daily management and casting easier.
Benefits
- Download and install apps on the headset from the phone.
- See battery status and headset settings.
- Start casting to a screen or projector with fewer steps.
- Manage multiple devices if you use several Quests.
How to do it
- Install the Meta Quest app from App Store or Google Play.
- Power on the headset and open the app on your phone.
- Follow the pairing flow (Bluetooth and Wi‑Fi); the headset will show a code or confirmation.
- Once linked, you’ll see the device in the app and can use the features above.
Organization and storageReference
Keeping headsets, controllers, and accessories organised reduces loss and extends the life of the equipment.
Good practices
- Labelling: mark each headset and its matching controller (number, colour, or code) so they are not mixed up.
- Usage log: note which headset each group or student used if needed for maintenance or incidents.
- Storage: store headsets in a fixed place, protected from impact and direct sunlight (sunlight can damage the lenses).
- Transport: use cases or carts designed for Quest when moving between rooms.
- Charging: use power strips or charging carts to charge multiple headsets at once; check that the LED indicates full charge.
References
SpecificationsReference
Knowing the headset specifications helps plan classroom use (space, battery life, compatibility).
Useful points
- Serial number: for warranty and inventory. Where to find it: see the model guide in the KB.
- Use with glasses: Wear Meta Quest 3(S) with glasses.
- Speakers and microphone: Quest 3(S) has both built in.
- Chipset, RAM, display, FOV, tracking, weight: Meta Quest 3(S) headset specifications, display specifications, tracking type, field of view, weight.
- Buttons and basic use: Use Meta Quest 3S buttons.
- Initial setup: How to set up Meta Quest 3(S).
What is App LabReference
App Lab is Meta’s channel for distributing apps in beta or not yet on the main store. In education it is used to access specific apps via link or invitation.
Typical flow
- Receive link or invitation: the instructor or developer gets an App Lab link by email or web.
- Accept: when you open the link and accept, the app is tied to the Meta account you’re signed in with at that time.
- Install on one headset: with the headset on and the same account, the app appears in the library or can be installed from the link.
- Replicate on multiple headsets: if all headsets use the same account (shared personal or institutional), the app installed on one can be installed on the others from the mobile app or from the headset.
Why it’s used in education
It allows using educational or experimental apps that are not yet on the official Store, with a link-controlled process.
Common issues
- App doesn’t appear: ensure the headset is signed in with the account you used to accept the invitation; if you accepted before setting up the headset, open the link again with the headset already set up.
- App doesn’t download: check Wi‑Fi and that there aren’t too many downloads queued; free space if needed.
Installing from the StoreEssential
The Meta Quest Store (inside the headset or from the mobile app) is the main source of official applications.
Step-by-step installation
- Open the Store from the headset menu or from the Meta Quest app on your phone.
- Search for the app by name or browse categories.
- Tap Get or Buy (depending on free or paid).
- Wait for download and installation to finish; the app will appear in the library.
Recommended apps for education
There are free and paid apps aimed at education: simulations, virtual visits, procedural training, etc. Check updated lists in the Store (Education category or similar) or in your institution’s resources.
Apps inside the headsetReference
Once installed, applications are managed from the headset (and from the mobile app if linked).
Check app version
In the headset library, select the app (usually via the three dots or “Info”) to see details; the installed version is usually shown there. Useful to ensure all headsets have the same version before class.
Uninstall an app
From the library, long-press the app icon and choose Uninstall (or Remove). You can also use the guide Delete applications on Meta Quest 3.
Accessing apps from the menu
From the Meta Quest 3 main menu, access the app bar. Using the controller trigger, open the installed applications window. In the top right corner, expand the categories menu and scroll down to "Unknown Sources" if your application does not appear in the main list. There you will find the app you want to use; select its icon or name to launch it.
App credentials vs headset account
App credentials (e.g. login inside the app) do not have to match the headset’s Meta account. Headsets can be on an institutional account while the app asks for a different educational login; manage those credentials according to your institution’s policy.
Note on app updates
The first time you open an application, it will launch directly. Updates are not downloaded automatically; to get them, access the “Update” section within the app if new versions are available.
Casting and external displayEssential
Casting lets you show on a screen or projector what the user sees inside the headset. It’s very useful for the rest of the class to follow the experience and for the instructor to supervise and guide.
What it’s for
- Guided observation: the group sees the same view as the person wearing the headset.
- Real-time feedback: the instructor can comment on what they see.
- Group control: keep attention and order during the VR activity.
How to turn it on
- From the headset: in the quick menu (Meta button), find Casting or Cast and choose the target device (Chromecast, Meta Quest app on phone/PC, etc.).
- From the mobile app: if the headset is linked, the app usually has a button to start casting to a TV or projector (e.g. via Chromecast).
Resources
Connectivity and dataReference
Headsets need connectivity to install apps, update the system, and use cloud services; you can also connect them to a PC or Bluetooth devices.
Wi‑Fi
- Connect Meta Quest 3(S) to Wi‑Fi
- In the classroom, use a stable network; if the institution’s network has strict restrictions or firewalls, consider a dedicated router for the headsets.
Bluetooth
- Connect a Bluetooth device to Meta Quest 3(S) (search for “Bluetooth” in official help).
PC connection (Windows)
- Connect Meta Quest 3(S) to a Windows computer (useful for file transfer or Link/Air Link if needed).
File transfer
- Transfer files from a Windows PC to Meta Quest 3(S) (via USB cable or official tools).
Cleaning and maintenanceReference
Keeping the headset and controllers clean is important for hygiene when multiple users share them.
Official guides
- How to clean Meta Quest 3
- Charging, maintenance, and care: see Meta Quest 3S documentation on Meta’s support site.
General recommendations
- Wipe the facial interface (face pad) and contact areas after each use with wipes or a cloth and non-abrasive, non-alcoholic product as recommended by Meta.
- Clean the lenses only with a microfiber cloth; do not apply liquid directly to the lenses to avoid damaging the coating.
AccessoriesReference
Optional accessories can improve comfort and durability in educational settings.
Where to find out more
Typical examples: alternative head straps, carry cases, facial spacers for glasses wearers, lens protectors. Choose according to use (classroom, transport, different users).
Pre-class technical checklistEssential
Going through this checklist before each session reduces technical failures and keeps the focus on the learning activity.
- Headsets charged: check that the LED indicates full charge (e.g. green at 100%).
- Apps opened and tested: have opened at least once the app you will use and confirmed it launches correctly.
- Boundary set: Guardian/play area drawn and tested in the actual classroom space.
- Casting tested: if you will project, verify that the casting device (Chromecast, app, etc.) works with the headset.
- Plan B ready: have an alternative activity if VR fails (Wi‑Fi, app, or device).
Next: Design with purpose